


Doors with your own hands at home: installation of door blocks, paneled doors with your own hands.

If you want to save on interior decorating, carpentry, and this is a considerable part of the money equivalent, then try to do it yourself. As they say: Eyes are afraid, but hands do.
Content:
Types of doors

Having acquired basic knowledge, we will try to make a door with our own hands. Doors are divided:
- by location - on the external and internal;
- on materials - on wooden, metal, plastic, composite;
- according to the design of the canvas - paneled, smooth, prefabricated, with double skin;
- by the nature of the movement - on swinging, sliding, folded, lifting.
Door block installation procedure
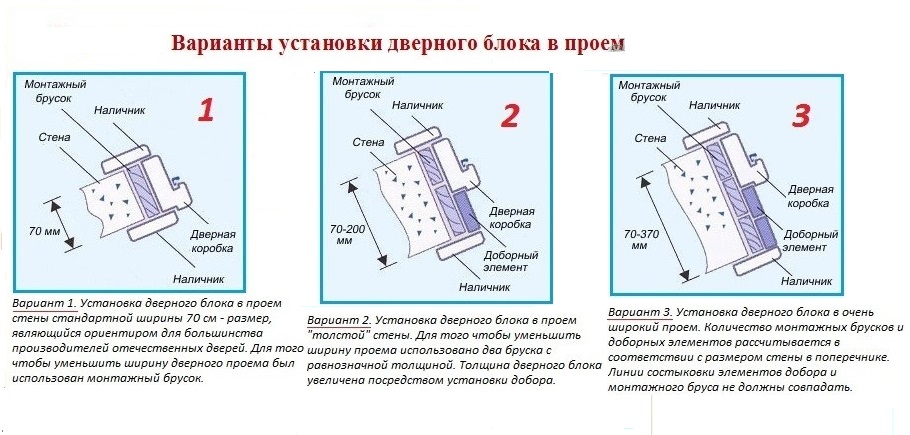
When installing door blocks, the following procedure must be followed:
- cleaning the opening in the wall;
- installation of the box in the opening;
- horizontal placement and nailing of the threshold;
- vertical installation of the box on the side of the hinges, fixing it on top and bottom;
- hanging the door leaf and checking the accuracy of the fit;
- checking the density of the vestibule of the door and the operation of the lock;
- fastening boxes on all sides;
- nailing platbands;
- sinking heads of nails.
Interior doors
Distinguish between right and left doors, depending on the opening side and hinge hinge. If you stand on the side of the door into which it opens, then at the right door the hinges will be on the right, and on the left - on the left.
Internal doors according to the nature of movement are divided into:
- swing doors;
- transforming doors and partitions.
It should be noted that advanced developers lay places in the project for the use of finishing materials, the installation of modern doors in homes that are offered to customers, such as: houses in the Ulyanovsk region.
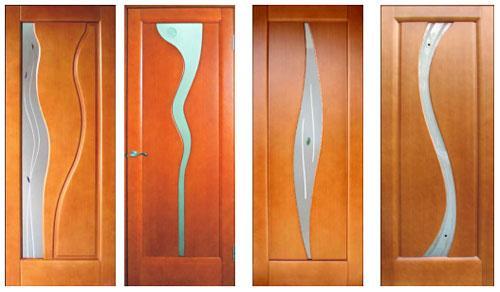
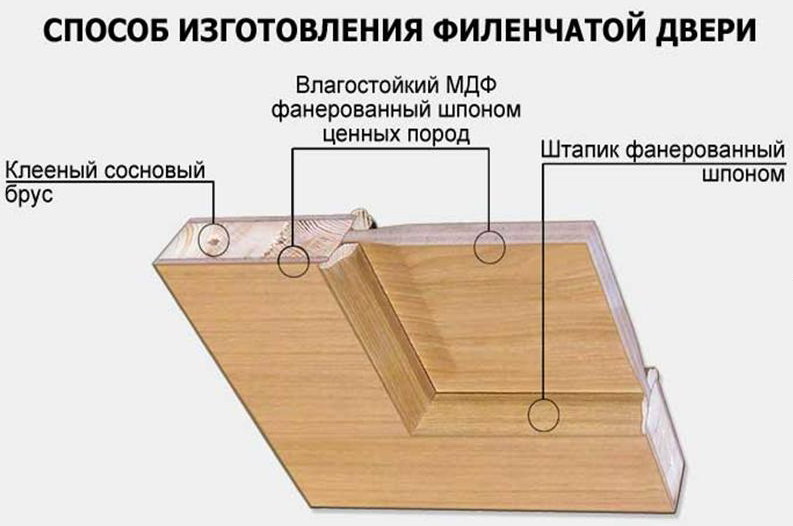
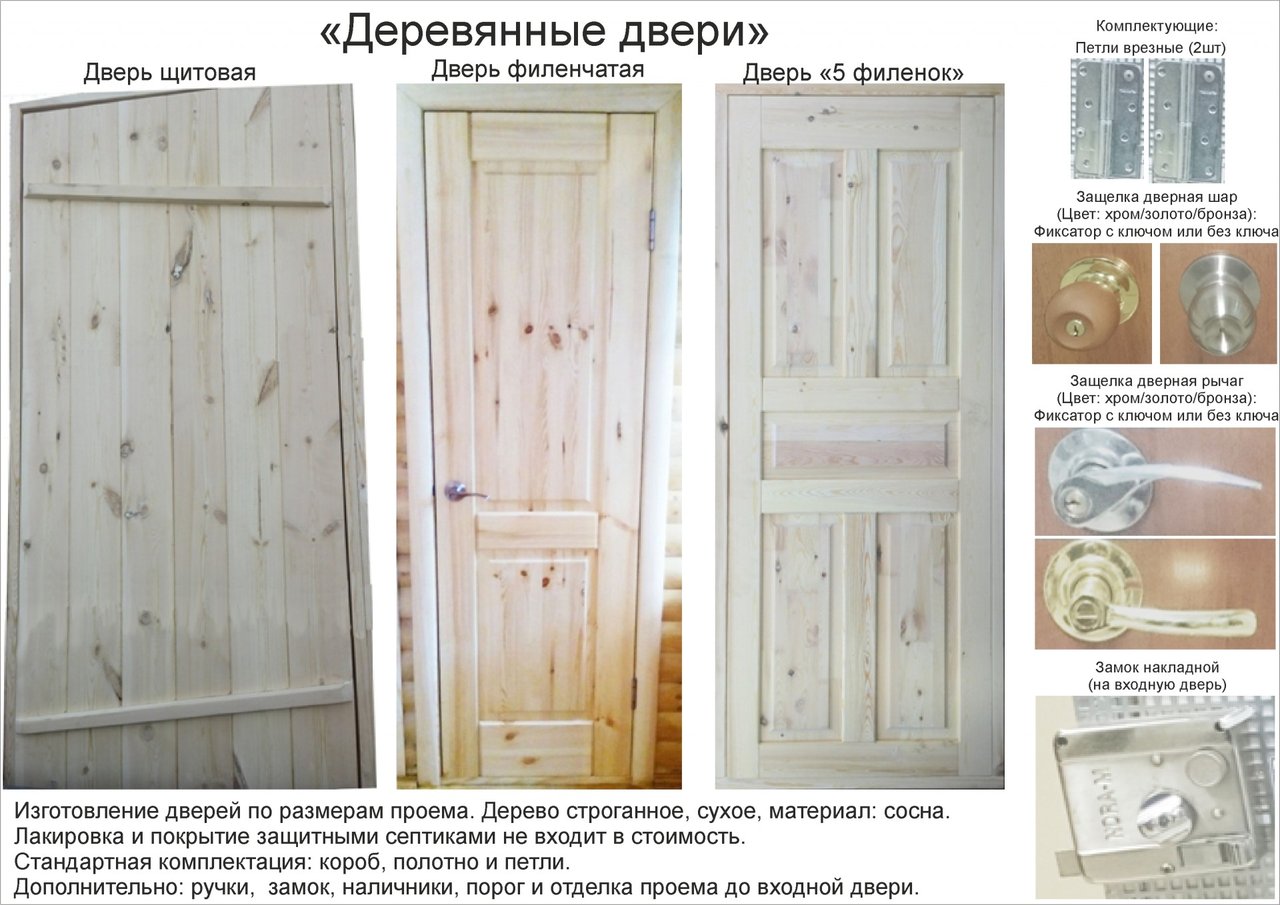
Hinged doors have a different configuration, there are rectangular and arched. According to the internal filling, swing doors are divided into solid doors, panel and paneled. We will try to assemble a paneled door. The best way to learn: is to take the old paneled door, disassemble it and reassemble it and then everything will be clear.
We make a paneled door
For the manufacture of doors, you must have a well-dried, wide coniferous board. Since the birch board twists very much, and the aspen is too soft - these types of wood are not advised to take. To get a good door, your chosen wood must cure for 1 year in a cool, dry place.
Before manufacturing a paneled door, the ends of the aperture are pre-sewn with a board. Then, carefully measures the height and width of the opening. There should be a gap of 20 mm wide between the door and the ends of the opening. With this in mind, a box of timber 50 mm wide is hammered together. and a thickness equal to the thickness of the wall. Experienced joiners fasten the box with wooden pins.
The resulting free space is sealed with tow or foam and covered with platband. To tightly close and open the door, there should be a gap of 5 mm between the frame and the door leaf. Now they are determined with the number of panels (panels are the inserts that make up the door leaf). The door is 2 meters high and 90 cm wide. It is convenient to assemble from six identical panels. Moreover, by changing the size of the panels and their shape, you can create a different picture of the canvas.
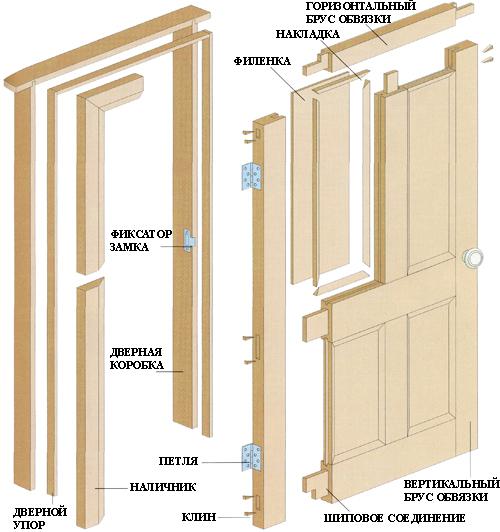
If the panel is six, then the door will require two side (main) racks with a width of 80-100 mm. and a thickness of 50-70 mm. (for mortise lock);
of the same width and thickness two horizontal (lower and upper) crossbars; one vertical jumper (middle rack);
four middle (intermediate) cross-beams.
If the panel is larger, then the design also increases the number of intermediate cross members. Taking into account all the above gaps, the length and width of the door leaf is made by 110 mm. shorter than horizontal and vertical box size. In the side racks of the future door, internal grooves 80-100 mm long., 15 mm wide., 15-20 mm deep., For fastening with crossbars, are cut out, and in the middle rack, the paneled door, tenons are cut out to connect to the upper and lower crossbars . In order for the upper part of the racks not to burst, a beam of 100-120 mm is taken. longer, the so-called technological tail.
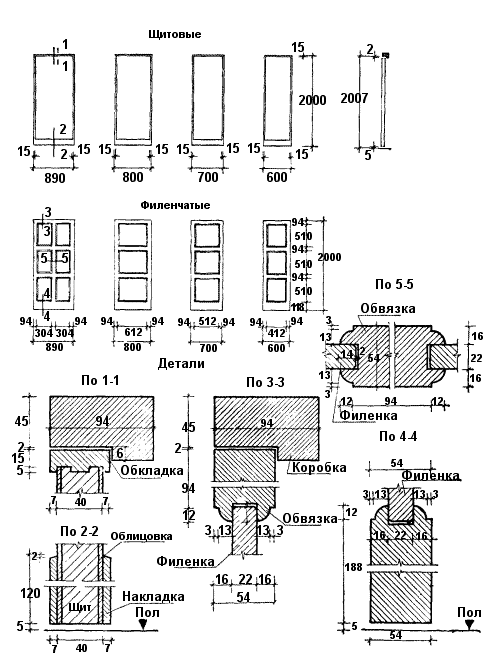
The ends of the crossbars are machined in the form of spikes, and on the side surfaces chamfers are cut for inserting decorative panels, 20 mm wide and depth. Then proceed to the manufacture of panels. It's easier to make them from an array of boards. But if such material is expensive for you, you can assemble the panel in parts. Since the height of the infill is 575 mm., You have to assemble it from 3-4 boards (depending on the width of the board, most often it is 150 mm.). For the junction of these parts, a groove 15 mm wide and depth is cut in the end of one of them, a tenon is sawn mirror-like on the other.

If the boards are thin, then a groove is made in each board, and a wooden insert is used for joining, put on glue, these boards are connected, thus the base of the panel is assembled. After the glue has dried, oblique cuts are made around the perimeter of the panel so that it fits tightly into the chamfers. The angle of the saw is selected by testing on spare boards.

Depending on the shape of the panel, on a flat surface, a decorative element is cut, the so-called figarei (in the form of a rectangle, square, ellipse, circle). The panel thus prepared is well polished.
All parts of the door are ready, now assemble the door without glue. They adjust the spikes so that the longitudinal and transverse racks fit tightly together, unnecessary technological tails are cut, the frame is polished, the ends are aligned, the panels are adjusted in thickness and length with the racks, holes are made in the attachment points and wooden pins are inserted.

When the fitting of the parts is completed, the door is disassembled, then all its parts are put on glue and reassembled. Drying of the door usually occurs under oppression. At the end of drying, hinges are screwed to the finished sheet and the door is hung in place. But, before you hang the finished door in place, it is advised once again to walk with sandpaper or a sanding machine on the finished door leaf.
