Search
Login
Recommended
Water skirting heater: warm water skirting what it is, installing a warm skirting.
Systems of a warm skirting board with a liquid coolant are now in vogue, as well as other know-how for the home. Moreover, the manufacturer claims serious energy savings: 25% more profitable than underfloor heating and up to 60% of oil heaters. We believe the manufacturer and begin the installation. True, a photo of such a system can be somewhat scary, but do not rush to give up. As they say, all ingenious is simple. And such a system, although it is new to us, is not so complicated. So, how to install and connect a warm baseboard with a liquid coolant? Let's consider.
Content
- Elements of the warm skirting system
- Connecting fittings and tools
- We start installing the warm skirting board: step by step video
System elements

To begin, consider what a warm skirting board consists of. Its main elements are:
- prefabricated metal box usually up to 14 cm high and 3 cm thick (for example, in Termіya - 160X40 mm);
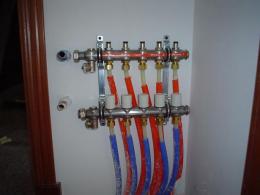
- distribution manifold;
- boiler;
- circulation pump.
The last three elements are a separate issue, in this review we will not deal with them. We only note that without a well-chosen collector, there will be neither efficiency nor economy.

So, what is a unit of a warm baseboard, the same box? If it is disassembled, and before installation it will be necessary to disassemble, then we will see:
- two copper tubes for coolant circulation, 13 mm in diameter (Mr. Tektum warm plinth) or 15 mm (Termіya);
- radiator assembled from brass lamellas;
- clips for fixing the radiator;
- metal case.
Here is such a simple device. But, for installation, we still need special adapters, connecting pipes and other fittings. We’ll talk about them.
Connecting fittings and tools

In addition to the baseboards themselves, we need:
- special adapters for connecting sections to each other;
- connecting pipes from the distribution manifold to the junction with the baseboard (cross-linked polyethylene of any available diameter of 12, 14, 16 or 18 mm);
- for installation in the corners, special rotary pipes are required (not included);
- adapters for connecting plastic pipes to a section (inch with internal thread);
- protective pipe in two colors: blue and red (and protection, and you won’t get confused which of the two to connect to the collector).

The number of adapters and the length of the pipes is purchased purely individually, according to the project.
From the tool we need:
- adjustable wrench;
- wire cutters (for removing brass sections);
- hammer drill;
- scissors for cutting plastic pipes;
- hammer.
If everything is in stock, we begin to collect heating a warm baseboard.
We start installing the warm skirting board: step by step

It should be remembered that the length of one circuit should not exceed 12.5 meters. These data will not be needed if the installation will be carried out according to the project drawn up and calculated by the specialist designer.

We start by laying pipes from the distribution manifold. We measure the distance from the connection point of the collector to the junction with the baseboard section. We take a plastic pipe and cut off the value that was obtained by measuring + 20cm for stock. We lay in the wall or floor, to whom it is better. But the pipe outlet should only be from the wall at a height of 6 cm from the floor and 15 cm from the nearest corner of the room. In this case, the pipes are one above the other, with a blue protective pipe on top.

Next, we take a self-adhesive insulation tape and glue around the entire perimeter of the installation of skirting boards. After that, we proceed to install the aluminum profile. Installation begins from the corner, we cut the profile at an angle of 450 and then to choose from:
- fasten to the floor / wall;
- glue on a special double-sided adhesive tape;
- or mount on silicone.

The next step in installing a warm skirting board will be installing clips. They are placed with the following step:
- 15cm receded from the corner and drill holes for the dowels;
- all subsequent clips are attached to the wall in increments of 40sm

After we installed the aluminum profile and holders around the entire perimeter of the installation of skirting boards, we proceed to the installation of convectors. Cut the plastic pipe to the required length. It is necessary to ensure that the pipe fits as evenly as possible into the skirting section, without kinks.

Now assemble the clutch. We put nuts, a sleeve and a rubber gasket on plastic and copper pipes. Insert the supporting sleeve into the plastic pipe. Twist with our hands and hold out with an adjustable wrench. We attach the radiator to the wall and mark, if necessary, the places where the brass fins are removed. If there are any nippers, gently remove the segment.

We take the next section and similarly with the help of an adapter we connect together. Skirting bodies must be fitted tight, with no gaps. But at the corners we retreat 1 mm from the edge of the corner. Otherwise, we will not squeeze the decorative elements later.

Again we put it against the wall and mark the extra segments of the radiator, remove it. Thus, we advance to the corner of the room.

In order to get around the corner, we use special corner connecting tubes. We twist the ends of the tube fixedly, by analogy with a coupler. We attach the skirting section, put on a nut, a sleeve and a rubber gasket. We twist and fasten the radiator to the clips. To do this, we take a wooden block and without extra zeal we press it until the copper tubes fully enter the latches. It’s better not to do this with your own hands, because the metal is thin, and the area of \u200b\u200bapplied force is much smaller, it is simply deformed.

The last section is looped by a special corrugated stainless steel tube. It connects just like all previous couplings.

Similarly, installation occurs around the perimeter of the room. Next we fix the baseboard cover. An insulating tape is glued to the inner surface of the lid. We attach the cover to the profile and snap. Some models need to be fixed with screws.

The next step is the installation of decorative elements: plastic plugs and corner joints. Everything, installation of a warm plinth + do-it-yourself is almost finished. It remains to connect the assembled system to the distribution manifold and start the water. After running the water, we carefully observe whether our system is leaky. If somewhere in the joints occurs pressurized key. We remember there is an elastic band, which, clinging to the edge of the coupling, does not let water through. It did not help then it is necessary to disassemble and check whether the sealing gum is damaged, replace if necessary.

So the warm skirting board system is mounted. As you can see, there is nothing wrong with it. The main thing, as popular wisdom says: measure seven times, cut once.


