


I’m building a gazebo with my own hands: the foundation for the gazebo, installing the stands of the gazebo, building the roof of the gazebo

The gazebo is a decoration of the garden and a place where the whole family lives in the summer.
Content
- Choosing the foundation for the construction of the gazebo video
- Types of foundation for arbors
- Installation of gazebo racks video
- Arbor roof construction
Choosing the foundation for the construction of the gazebo
foundation on sandy or rocky ground
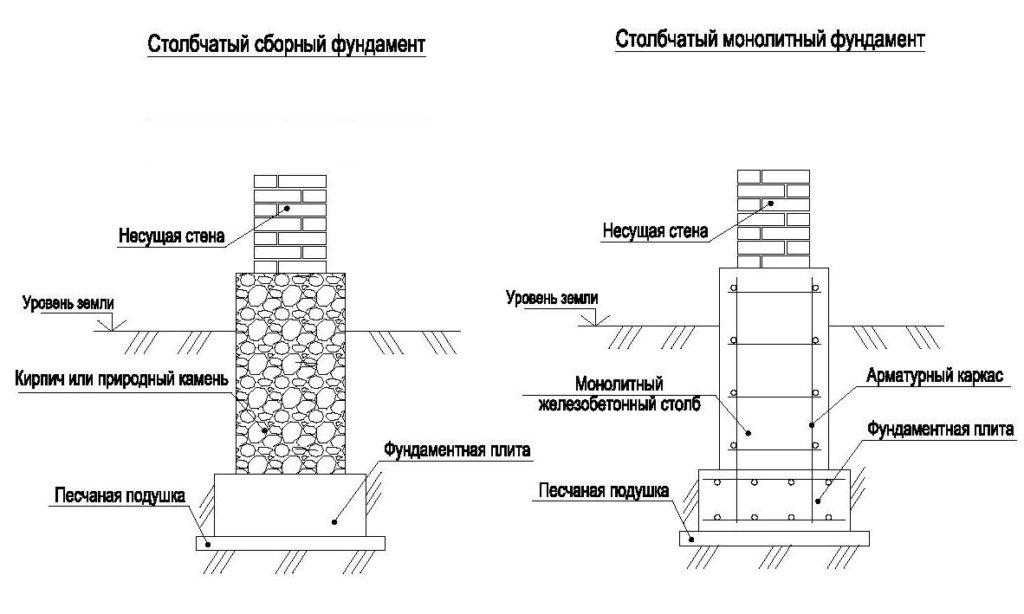
After choosing and clearing the place for the construction of the gazebo, the question of the type of foundation for our gazebo is resolved. This structure is usually installed on columnarsolid or strip foundations.

To facilitate the construction, in order to avoid mistakes, it is necessary to know the soil of your site. Sandy and rocky soils, the most common and reliable. On such soils, the construction of any of the above foundations is possible, without fear of its destruction, if there are quicksand on the site, in such cases it is better not to use solid monolithic foundations. Most suitable columnar foundations or install arbors on racks.
clay foundation
Clay soils are the most insidious, unevenly swell when freezing, when swelling raise the foundation, which leads to its warping.
As a result, any building in will be deformed and skewed.
Therefore, on such soils, it is recommended to install columnar foundations with a minimum, not more than six, number of racks.

Moreover, these racks are located only around the perimeter, since inside the building the foundation freezes later than the outside, as a result of which, the skew only increases.
It is possible to reduce the effect of swelling on the foundation by isolating it from the ground. For what, the underground part of the foundation or racks is wrapped with roofing material or polyvinyl chloride film. As a result, clay does not freeze to the foundation and swells, glides over the surface without raising the rack.
Types of foundation for arbors
foundation in the form of wooden chairs
The foundation in the form of wooden chairs is often used for gazebos, they are made from the butt of the trunk, with a diameter of at least 20 centimeters.
Install them on special linings (flat stone, concrete slab, etc.).
Before installing the foundation, the bottom of the pit is covered with gravel and rammed thoroughly, a lining is placed, it increases the area of \u200b\u200bpressure transfer to the ground and increases the stability of the foundation.

Fig. 1 Wooden columnar foundations: 1 - rods; 2 - chairs; 3 - simple grillage; 4 - piles
Chairs are lined and buried in the ground by at least 125 cm. They are installed around the perimeter of the gazebo. The distance between the chairs should not exceed 2 meters.
The disadvantage of this foundation is its limited service life.
column foundation of brick, stones, concrete
The foundation of brick, stone or concrete pillars has an almost unlimited service life. The foundation of the brick must be isolated with a layer of roofing felts or roofing material from the ground.
Concrete foundations are more reliable and do not require insulation from the sides, the cross section of such a foundation is usually 50x50 cm.
On columnar foundations of cast concrete, it is desirable to lay special parts that make it possible to fix the gazebo.
It can be just a metal plate or a corner with holes.
other foundations
Strip foundations for gazebos are rare.
In some cases, the foundation for arbors can be a horizontal platform of cast concrete or flat stones.

In any case, the wood from which the gazebo is built must be isolated from ground moisture, for which one, two layers of roofing material are laid between the foundation and the wood.
Installation of gazebo racks
arbor layout
Before starting work on the construction of the gazebo, you need to make markup.

To do this, in the center of the site, a metal rod is hammered, a metal ring is put on it that can rotate freely, a thin nylon cord is tied to the ring, the radius of the circle that the gazebo should describe is marked on the cord, and a rod with a sharp tip is tied to the other end.
Rotating the stretched cord, outline a circle on the site.
The diameter of the circle depends on the size of the gazebo, usually it is from 240 to 300 cm.
Then, determine the direction of entry into the gazebo and mark on the circumference one of the corners of the polygon. A chord is drawn from this angle; its length is equal to the radius of the circle.
This chord denotes one of the sides of the arbor, the place of its intersection with the circle is the second corner of the hexagon.

From the second corner lay the next chord and so mark all the remaining corners of the gazebo. All these corners are marked with pegs. If the end of the sixth chord comes to the starting point of the first, the marking is done correctly.
installation of racks
To control the correct installation of the arbor racks, it is necessary to prepare a diagonal template. It can be a wooden lath on which the corresponding notes are made.
Remember that a deviation in the size of the hexagon can affect the appearance and stability of the gazebo. The arbor stands can be installed directly in the ground, performing the function of a columnar foundation.
At the same time, you can bury the racks deep in the ground or concreted into prepared pits. Given that strong gusts of wind or other influences can destroy the gazebo, the stoics must be buried by at least one quarter of the total length.

Conclusion - when choosing the size of the racks, you must take into account the height of the arbor and the depth of the rack in the ground.
The pit for the stand of the gazebo is dug deeper than one quarter of its length, since crushed stone is poured into the bottom of the pit and carefully packed.
Crushed stone serves as the basis for racks and at the same time as drainage for groundwater. After pre-installing all the racks, the template carefully checks all the diagonals of the polygon, then plumb the verticality of the racks.
The racks verified in this way are fixed with temporary supports.
Then, around the perimeter of the pit dug under the rack, a cover is made of polyvinyl chloride film and filled with concrete.
To reduce the amount of concrete, the pit is filled layer by layer with crushed stone and coarse wet sand, ramming each layer. At the time of setting concrete, it can be covered with a layer of soil. Further work on the construction of the gazebo is carried out only after the concrete has completely hardened.

To trim all racks to the same height, use the hydraulic level (laser level).
To do this, at all racks, at the same height, marks are made with chalk or coal.
So that all the arbor racks are installed at the same level, only one rack is selected as a control.
If the gazebo is installed on the foundation, then, laying a waterproofing gasket in the form of two layers of roofing material, lay out the lower harness, and already put the racks on the harness.
Arbor roof construction
Installing the upper ties
Roof installation work begins with the installation of screeds in the form of a hexagon (octagon), which will hold together the upper parts of the racks and balance the spacer forces arising from the load on the roof.
A wooden hexagon (octagon) is assembled on the ground, and in order to fully coincide with the uprights, it should be marked out using the method described above.
And only after that, it is installed on racks from above.

For fastening a hexagon (octagon) on racks, nails are used, driving them vertically from top to bottom, or screws, or metal plates.
Installation of rafters
The shape of the roof depends on how the rafters are installed. In multifaceted arbors, they usually make straight tent, broken or domed roofs.

The simplest option is a direct hipped roof. During its construction, six (eight) rafters (according to the number of arbor racks) are installed, rising to the top of the dome.
As rafters, bars of 60x40 mm are used.

When constructing a domed roof, one of the most difficult moments is rafter connection in the center of the dome. The best way to connect the rafters at the top is to join in a closed chain, like a fan.
This work is done like this:
- preliminary, the ends of the rafters are planed at an angle of sixty degrees, holes are drilled at the upper ends with a diameter of 12 mm. for fastening to the corners and choose rectangular recesses at the required angle at a distance of 30-50 cm from the lower end to support the lower harness;
- prepare screeds from a steel strip measuring 200x60x4 mm. with holes with a diameter of 12 mm. at a distance of 80 mm. from the edge, the steel strip is bent in the middle at an angle of 60 degrees;
- connect the rafters in pairs with the help of these metal ties (laying washers under the nuts) and fold them like a tripod, bringing together the lower ends of the rafters;
- during assembly, the nuts are not completely tightened, to give the entire structure flexibility during installation;
- in the center of the gazebo, install a temporary support rack, with its help, raise the dome structure above the gazebo and connect the rafters with the racks using bolts and nuts;
-after fixing the rafters, remove the temporary central rack, tighten the bolts with the necessary force;
-through the center, a piece of water pipe with a thread on both sides is passed through and the locknuts on top and bottom are screwed on it.
