Search
Login
Do-it-yourself laying floor tiles
Laying ceramic tiles on the floor is becoming very popular. Strength, durability and beauty, ease of cleaning attracts the owner to use this type of floor. The most important advantages can be called abrasion resistance, ease of installation.
Laying ceramic tiles requires compliance with several principles, applying which even beginner tilers can perfectly do this job.
Content
- Foundation preparation
- Quantity calculation
- Tile selection
- Tile Inventory
- Styling technology video
- Tips from experienced stackers
- Tile Laying Options
Foundation preparation
The base for the tile must be strong and even.
Before starting work, it is necessary to close all windows and doors to eliminate drafts in the room where the tiles will be laid.
All work is carried out at temperatures above 5 degrees Celsius.
Before starting work, you must tidy up the room. Remove everything from the floor surface, you can vacuum it, remove moisture. Inspect the surface, if necessary, remove all stains of chemical origin, oil stains, as in the future they will interfere with the process of adhesion of building mixtures to the base. During operation, later on, defects due to poor surface preparation can cause defects in the laid tile, such as chips, cracks, tile mobility.
We proceed to leveling the base, using a level, water or laser, vertical differences are detected, if differences are detected, they must be eliminated with a cement screed.
It is necessary to prepare a solution, for which the purchased dry mix is \u200b\u200bdiluted according to the attached instructions, if the deviations in level are no more than 5 mm., This issue is solved during tile laying, if the deviations are more than 5 mm., They must be eliminated with the help of a floor screed.
After checking the horizontality of the base, its surface is primed with a waterproof liquid and time is given to dry this insulation before laying the tiles.
If the screed of the prepared base was made, it must be dried for at least 12 hours, and tile laying should be done in 2-3 days.
Quantity calculation
The selected floor pattern is applied to a sheet of paper, best of checkered, taking each cell - with tiles, then this pattern is painted. The number of all tile cells is calculated, it is necessary to add 10-15% for all sorts of surprises, we get the initial number of tiles.
Tile selection
When choosing a tile, it is necessary to consider the durability of the coating, which directly depends on the load.
bathroom tile
The floor of the bathroom has a low cross. Bathroom tiles can be selected with a low abrasion class, but resistant to moisture and chemistry. Pay attention to the fact that this tile is not slippery in order to avoid injury.
kitchen tile
The kitchen floor has an optimal load, the tiles for it are selected in accordance with the third class of abrasion, but with a high resistance to mechanical stress, in order to exclude defects from impacts of falling dishes.
hallway tiles
The floor in the hallway corresponds to the fourth class of wear resistance, as it has the highest cross-country ability. Using all the above knowledge, in addition, consult with a qualified seller, with a margin of 10-15%, purchase your chosen tile, and proceed with laying.
Tile Inventory
Tile
Tile cutter
Crosses of the necessary size
Saw
Rubber mallet
Adhesive solution
Level
Roulette
Putty knife
Scraper with nozzles
Buckets
Styling technology
Initially, before laying the tiles on the glue, it is necessary to carry out a control laying of the tiles on a dry base, thereby checking once again the pattern and the correspondence of the quantity.
Cut pieces, if the tile does not fit completely, must be hidden in the corners, crosses are used to get an even seam. For cutting tiles, a tile cutter is used.
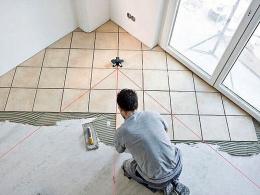
Laying tiles, made depending on the pattern. If the drawing goes according to plan from the center of the room, it is necessary to markup, find the center.
The room is divided into four equal parts, for which a nail is hammered into the floor at the middle of each wall and the cords rubbed with chalk are pulled across the cross, then the perpendicularity of these cords is checked. To check the perpendicularity, 1200 mm is measured from the intersection point on one line, and 1600 mm on the other, by connecting these points, you should get a distance of 2000 mm., This indicates that the measurements were taken correctly, these lines can be broken, i.e. e. stretched and rubbed with chalk laces slightly raised and sharply released, thereby you get the center and reference lines for laying tiles. You can draw several parallels for control.
If the floor pattern provides for diagonal solutions, additional reference lines are applied, they go from the point of intersection of the cords (center) at an angle of 45 degrees to the previously broken lines.
If the tiles are parallel to the walls, they are laid starting from the point of intersection of the cords, in accordance with the figure, in one quarter of the room, then the second, etc.
Tips from experienced stackers
When laying tiles, guided by the advice of experienced stackers.
For example, the spatula is taken the larger, the larger the size of the tile, for laying the tile on warm floors, it is necessary to use reinforced solutions.
To apply glue in even stripes, always use a comb spatula.
Tiles should be laid quickly, but with high quality.
The height of the tile is leveled with a rubber mallet. If when laying the tile, it is recessed, it must be removed and add the solution.
It is necessary to constantly monitor the coincidence of the edges and the position of the tile in one plane.
Tile Laying Options
When laying tiles, there are several options. For example, butt-to-butt or seam-to-seam laying requires a lot of attention and control.
Laying in reverse or with a shift, it is easier, small flaws received during laying are almost invisible, there is also laying the tiles diagonally.
It is necessary, during installation, to carefully remove excess adhesive, to monitor the cleanliness of the tiles.
After laying the tile, it is necessary to leave it without load, alone for 72 hours, after 72 hours, grout the joints with mastic, carefully removing the excess.
Tile joints dry out within 1-2 days.


