Search
Login
Recommended
Cellar on the plot, types of cellars, materials for construction, choose a place for the cellar
Cellar - a building very popular in the countryside. In a cellar built in accordance with the rules and equipped with ventilation, it is very convenient to store vegetables grown in your own garden: for a long period they do not lose their taste and preserve the maximum amount of vitamins. The cellar is also suitable for storing preserves and pickles.
Content
- Cellar on the site - choose the right place
- Digging and foundation laying
- Materials for the cellar - we build walls and floors video
- The hood in the cellar video
- Waterproofing video
- Thermal insulation
- Cellar in the house
- Other types of cellars
Cellar on the site - choose the right place
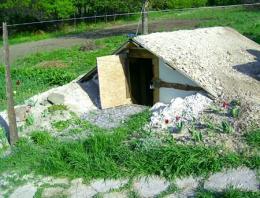
For the construction of the cellar you will need to dig a pit about 2-3 m deep, the optimal area of \u200b\u200bthe cellar is about 8 square meters. m. In order not to have problems with entering melt or groundwater into the cellar, it is advisable to choose the highest place for its construction. Of course, this is important if the cellar is being built separately, and not as a basement for a capital building.
Before you begin construction, you should determine the depth of the groundwater - even if the water rises to the maximum mark, it should not flood the cellar. Usually the height of the groundwater does not exceed a two-meter level, which is quite enough for construction. Depending on the composition of the soil, the option of arranging the floor and waterproofing is chosen.
The best time to build a cellar is summer, when groundwater sinks to a minimum height.
Digging and foundation laying
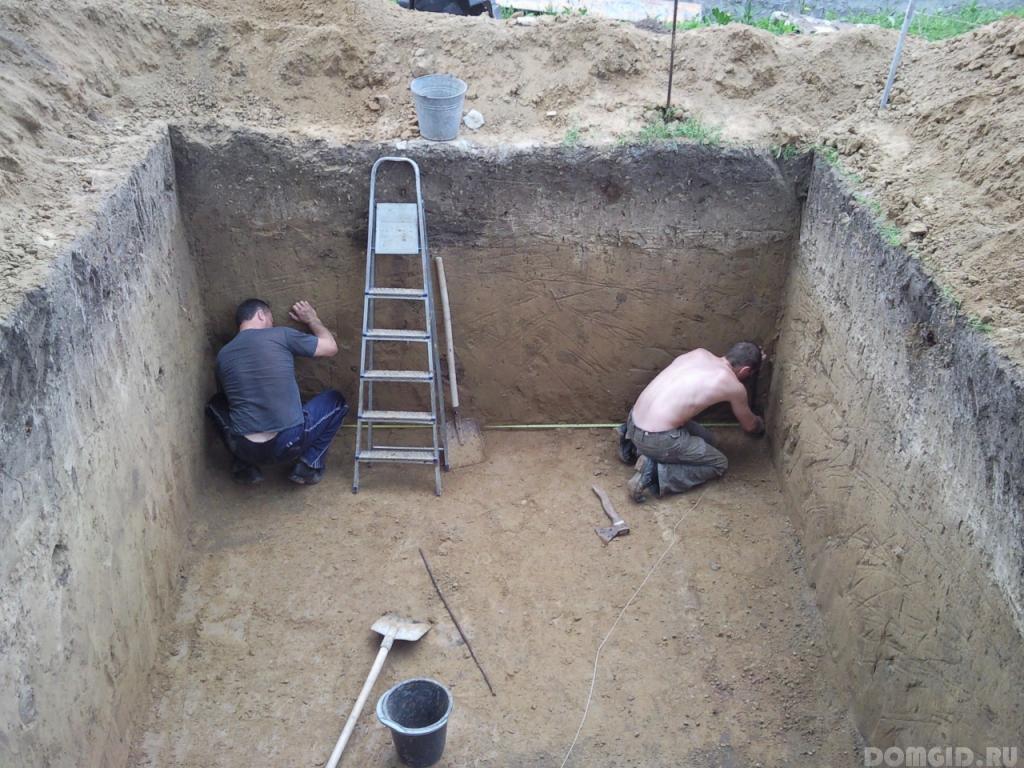
The construction of a cellar in a summer cottage begins with marking on the selected site the size of the structure. Then remove the top layer of soil and begin digging the pit, calculating its depth, taking into account the level of groundwater. With dry soil, the dimensions of the pit should correspond to the dimensions of the structure - all work will be carried out from the inside, if the soil is wet - the pit is digged in large sizes - waterproofing work will have to be done on the outside of the cellar walls. The steepness of the slopes of the pit depends on the type of soil.
The pit is allowed to stand for some time to make sure that water does not leak through its walls. The places where water appears are covered with clay swabs, dug a ditch 0.5 m deep, trampled under it with greasy crushed clay, and tamped strongly.
In order to arrange the foundation of the structure, the bottom is leveled and tamped, covered with a layer of sand 15 cm, then gravel and oily clay. This is necessary if the groundwater lies at a shallow depth. Next, pour a layer of concrete with a thickness of 5 to 10 cm. Concrete after solidification is poured with melted bitumen, lined with ruberoid strips, again concreted with a layer of 10-15 cm.
For the construction of the foundation, rubble stone or crushed stone, poured with a sand-cement mortar, is used. The dimensions of the foundation should exceed the outer dimensions of the cellar by 0.15-0.2 m on each side.
Materials for the cellar - we build walls and floors
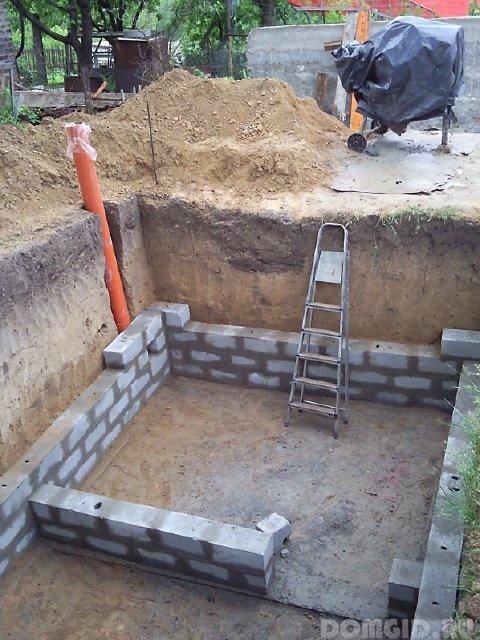
Materials for the construction of walls use the most diverse:
- concrete
- rubble stone
- red brick
- wood
- asbestos cement sheets.

Wall thickness is planned depending on the material:
- concrete - 15 cm
- brick - 12 - 25 cm - depending on the type of masonry
- boot - up to 25 cm.
For the casting of walls, concrete of grades 50 or 100 is used, the construction of formwork from boards around the perimeter of the cellar will also be required.
For the construction of stone walls using granite, sandstone or dolomite pieces of rough processing. The stones are selected, stacked so that the joints have a minimum thickness - this will reduce the consumption of cement and reduce the risk of settling of the masonry.
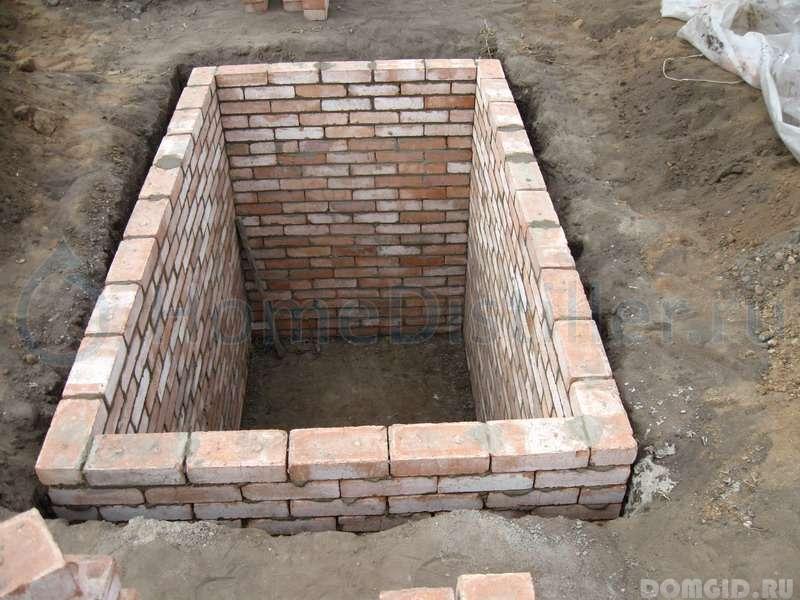
At brick walls and buta make dressing stitches. If it is planned to plaster the surface of the walls, then it is allowed to perform masonry in a wasteland, i.e. the solution may not reach the wall surface by 1 - 1.2 cm.

To close the cellar use any available and sufficiently durable materials. The easiest option is to use wooden poles, bars, boards, slabs. They are treated with an antiseptic, laying - they cover with any heat insulator (30 cm layer). Ceilings are lubricated with clay, covered with soil or slag. Using combustible peat or sawdust as backfill, cover them with at least a 2 cm layer of soil or sand.
If reinforced concrete slabs are used as a ceiling, it will be necessary to perform sealing of the joints with a cement mortar. Next, the slabs are poured with molten bitumen and roofing material is laid on it. In the role of insulation can be used slag.

If a ridge is to be built over the cellar, then its door should face north so that it is less heated by the sun. Walls are made of any material, the roof is made of materials with low thermal conductivity.
In the ceiling, a hatch with a warmed lid is equipped.
The hood in the cellar
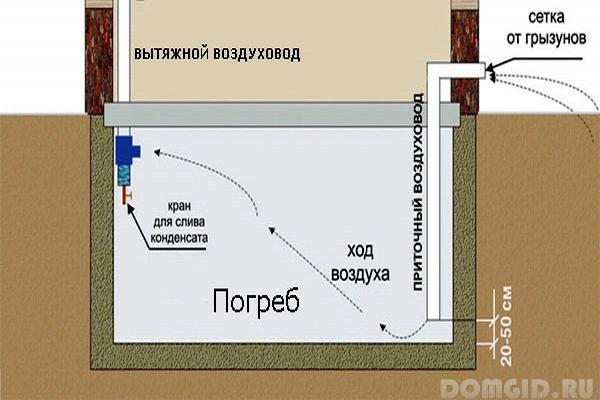
Ventilation premises - an extremely important moment, the quality of food storage depends on its proper organization. For ventilation of capital structures, two ventilation pipes:
supply air, installed in the lower part of the cellar, at a height of about 0.5 m above the floor
exhaust - built in the upper part, under the ceiling.
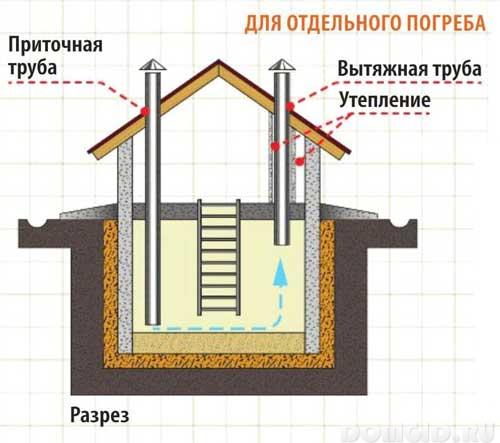
Pipes can be ceramic, metal, asbestos-cement, planks. Install them in different corners of the room - this eliminates the possibility of sucking in fresh air. Additional ventilation will be made through the gaps in the doors and hatch.
For the formation of a sustainable process of providing fresh air, the exhaust pipe must be raised above the ridge of the roof of the cellar. The exhaust pipe should be insulated or double. The cross section of the pipe is calculated depending on the size of the cellar, for example, for a room of 8 square meters. m, an exhaust pipe with a cross section of 12X12 cm is required. The pipes are equipped with dampers and valves - this will make it possible to adjust the speed of air movement. It is enough to equip some types of cellars with a grill in the entrance hatch.
The efficiency of the exhaust system can be checked by observing how the smoke will move in the room. A signal that the ventilation level is insufficient will be the appearance of mold, dampness, unpleasant, musty air, the appearance of condensation on the ceiling.
To make it more convenient to ventilate, the internal cellar doors are best made lattice. To absorb excess moisture inside the cellar put boxes with substances that actively absorb moisture, for example - with salt or quicklime.
Waterproofing
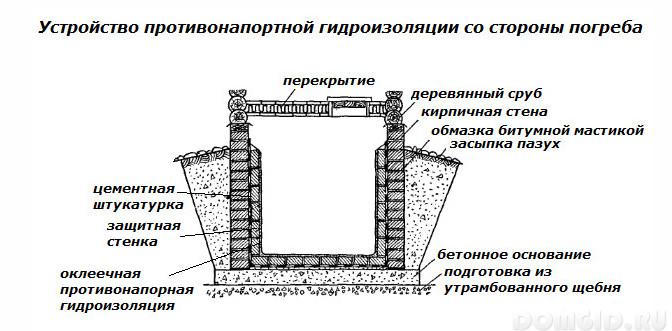
Coming to the arrangement of waterproofing, it should be understood that its process itself is less complicated and time-consuming than the correction of errors made during its implementation. Therefore, all work should be done carefully and efficiently. The construction of a waterproofing system makes sense only if:
- correctly chosen constructive solution of the cellar
- use of quality materials
- performance of work according to all the rules.
With a high level of groundwater it is recommended to perform pressure-tight waterproofing. It will also be needed if there is a threat of hydrostatic pressure on the walls from the side of melt or rain accumulating in the space between the walls of the cellar and the foundation pit, i.e. stagnant waters. This applies to cases when the cellar was built on dense clay soils.

To make the basement of the cellar and walls waterproof, double-sided plastering of brick and concrete walls with a solution consisting of 2 parts of water and 1 part of cement is used. Next, a layer of pressure-resistant waterproofing from roofing felts or roofing felt is mounted, in 3-4 layers, pressed with a protective wall to protect it from damage. The protective wall is built of red brick, the space behind it from the side of the pit is equipped with a clay lock, which will extend the life of the waterproofing layer.
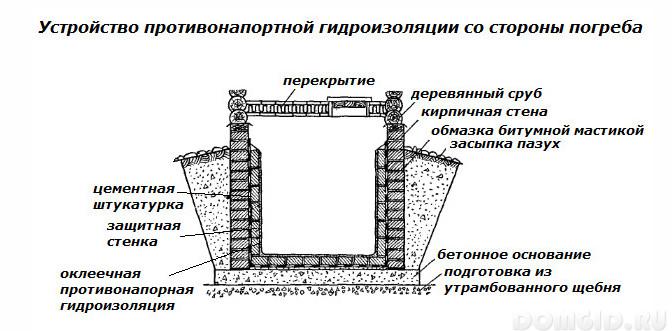
If groundwater accumulates during the performance of work in the pit, then it will be necessary to take measures to drain it - the construction of a drainage system - ditches at the bottom of the pit leading to the drainage well.
Waterproofing the walls are coated, glued or mixed waterproofing, involving the use of mastics and rolled materials at the same time.
In order to provide storm water discharge a drainage system is constructed from the cellar, which is a ditch approximately 0.5 m deep.
Thermal insulation
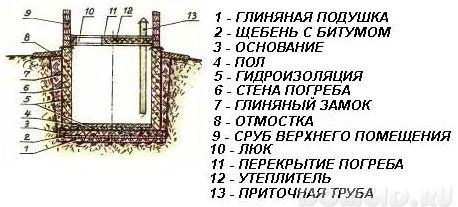
To obtain optimal temperature values \u200b\u200binside the cellar in the summer and winter produce thermal insulation ceiling and walls mineral wool, polystyrene foam or styrene foam insulating film. When choosing a material, one should take into account what surfaces are made to which the heat insulator will be attached. For example, attaching polystyrene to a brick wall is very easy, while mineral wool or film will require the installation of beacons.
Cellar in the house

If you decide to build a cellar in the house, or rather, under the house, then it is better to plan its placement under non-residential rooms, preferably under unheated ones. An ideal place to place it is a veranda - the temperature in it is lower than in a house, it will also be easier to equip a ventilation system. If the only possible option is to place the cellar under a heated room, then it will be necessary to perform thermal insulation of its overlap, you can mount a five-centimeter layer of foam in the screed of the arch. You will also need to consider the best option for a high-quality ventilation device - otherwise ensuring quality storage of products is unlikely to be possible.
Other types of cellars
Depending on the device, the cellar can be:
- buried
- half buried
- ground.
half-buried cellar

We examined the construction of a buried cellar above, it is preferred in areas where groundwater lies at a sufficient depth. If the terrain is low, then a more appropriate option would be to build a semi-buried cellar. A pit for it will be required for a depth of only 0.7 - 0.9 m, the dimensions of the pit should be much larger than the dimensions of the cellar itself - they should allow the installation of external heat and water insulation. In order not to unnecessarily damage the soil, the foundation pit is dug manually. If aquifers are detected, they should be carefully sealed with clay to a depth of 0.15 m.
For the construction of walls, brickwork or concrete slabs are used. Wall plastering is carried out with the addition of waterproofing material aquatron, which provides:
good adhesion to a brick or concrete surface,
water resistant
frost resistance
easy application.
Waterproofing can be replaced with a clay lock 30 cm thick. It is necessary to waterproof the entire surface of the foundation and walls from the outside. For the construction of the slab, a slab is used, after laying it is treated with a clay solution, after drying it is covered with soil.
land cellar
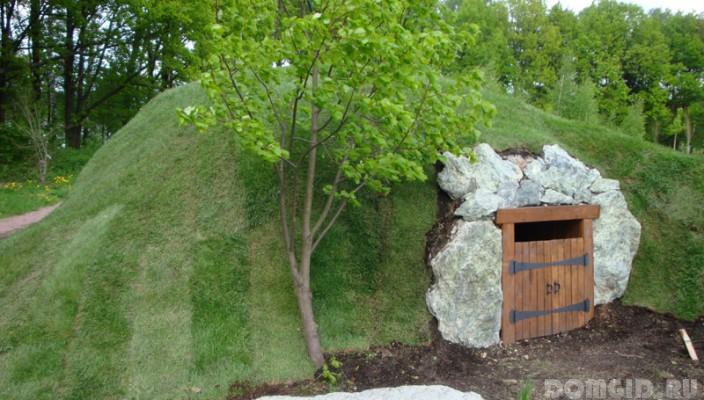
There are different types of land cellars; their difference is due to the place and construction technique. A wall-mounted version of the land cellar is attached to one of the walls of the house. It is usually built of bricks or monolithic concrete. Brick masonry is performed in one brick per sand-cement mixture. The walls of the cellar are plastered on both sides with cement mortar. Then, waterproofing is carried out on the outside with bitumen coating in 2 layers.
Before constructing the floor, the soil inside the cellar is carefully leveled, a layer of concrete of about 15 cm is poured. After the concrete has completely hardened, the floor should be laid with a thickness of at least 5 cm.
How to wiring

For comfortable use, you will need to consider a way of lighting. Since there will be no access to the cellar in daylight, you will have to use a flashlight when visiting it. It will be more convenient to conduct electric lighting. It is best to take a copper wire with braided rubber insulation. Wiring is performed externally. Do not install outlets in the cellar. All electric lamps must be equipped with protective glass reinforced caps. The switches are installed outside, at the entrance to the cellar.
Antiseptic treatment

So that the cellar in winter does not become a haven of fungi and mold, even before loading vegetables into it, it is necessary to treat the walls, shelves, and serifs with antiseptic drugs. If resorting to the use of chemicals is undesirable - you can treat all surfaces with slaked lime.
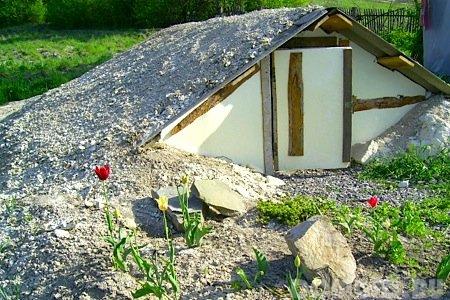
The next variety - a cellar with an embankment, is characterized in that during the construction process its external walls are surrounded with soil. This helps maintain a stable temperature and humidity inside.


