 |
 |
 |
 |
DIY drywall installation

The speed of installation, functionality during operation and clarity of lines - all these are the features that characterize drywall.
Content
- General information
-
Mounting Methods drywall
- Installation of drywall (GKL) on a metal frame
- Useful Tips
- Gypsum plasterboard wall covering with glue
General information
advantages of drywall
Aligning walls with drywall is an increasingly popular form of interior decoration. The main advantages of drywall: environmental friendliness, low weight, relative ease of installation and surface, convenient for further finishing.
Due to the presence of 30% water in the material, drywall is able to regulate the humidity in the living room: with increased humidity, the drywall sheets absorb moisture, and when dry, they give it away.
drywall structure
Drywall is a modified gypsum core located between two layers of cardboard, sheet thickness 6, 8-9, 10,12,5-13 mm., Standard width 120 cm, length from 250 to 350 centimeters.
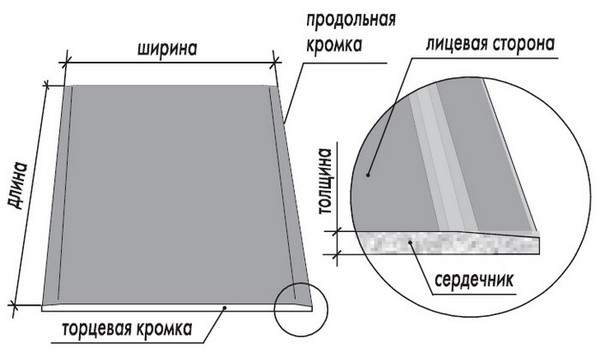
Using drywall, you can align the walls, floor, ceiling, as well as install partitions, construct suspended or; filed; the ceilings.

For installation of curvilinear structures, gypsum board with a thickness of 8–9 mm is most often used. For roofing, a thickness of 10 mm., In all other cases 12.5–13 mm thick.
types of drywall
When aligning the walls, the length of the sheets is chosen taking into account the height of the room, the fewer joints, the fewer problems during installation and the lower the likelihood of cracks.
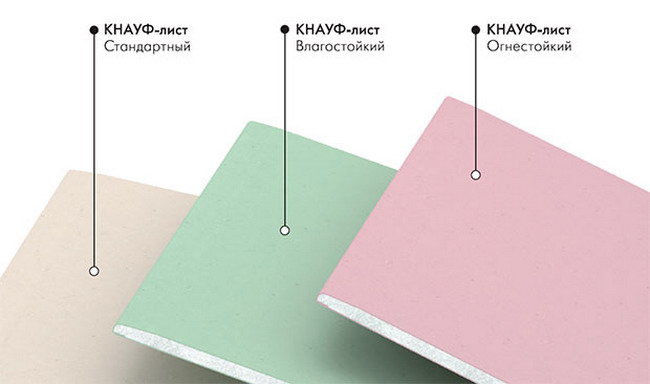
There are standard, fire-resistant and combined (moisture-fire-resistant) material.
We have the most widespread standard and moisture-proof drywall.
Methods for installing drywall
To align the walls, there are several ways to install drywall:

-on a metal frame;

-on a wooden frame;
-cladding of walls with plaster mounting adhesive.
on a wooden frame
Wooden frame is rarely used.
The quality of such a cladding is highly dependent on the humidity of the wood used, for which it is necessary to maintain a constant humidity in the room.

Failure to meet these two conditions is the reason for the appearance of cracks.
on a metal frame
The most common installation method is metal frame cladding.
For this, a ceiling profile with a cross section of 60x27 mm is used. A profile guiding with a cross section of 28x27 mm. and direct suspensions.

To work at home when installing drywall and erecting a frame, you will need: tape measure, metal scissors, a retractable knife with a break-off segmented blade, a cord, a square, a plumb line, a level, an electric drill, a screwdriver.
wall cladding with gypsum mounting adhesive
For such work, usually use special mounting glue, such as Perlfix, but you can glue drywall and universal filling type Fugenfyuller, with a small amount to be applied.

But best of all, before starting work, read the instructions for use.
Installation of drywall (GKL) on a metal frame
wall marking
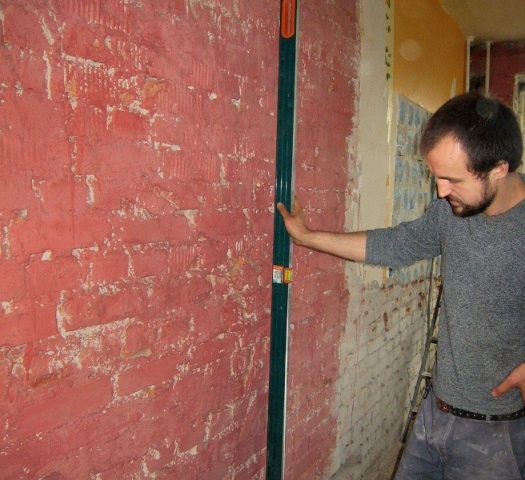
GKL installation begins with the marking of the wall, that is, it is necessary to determine the most protruding point inside the room, this is done using a cord and a plumb line (cord-plane wall, plumb-vertical).
After determining the most protruding point of the wall, a plumb line is lowered from it and a note is made on the floor for the guide.
The inner part of the guide should come close to the mark, this helps to minimize the volume and area of \u200b\u200bthe room where the repair is made.
When erecting the frame, it is necessary to take into account the thickness of the insulation used in the repair.
After attaching the guides to the floor, the height of the wall is divided into equal sections, not more than 1 meter, horizontal lines are drawn at these marks.
On these lines, marks are made for the racks of the frame, while the distance between the profiles (60x27) should not exceed 60 cm. At these marks, direct suspensions are mounted that hold the rack profiles.
When installing thermal insulation, rack profiles are installed in direct suspensions only after they have previously put the upper guide on the racks.
Then the insulation (mineral wool, polystyrene) is mounted on direct suspensions.
installation of uprights
After that, the angular posts are set vertically, using a level or plumb during operation.
By pulling the cord between the extreme racks, the remaining intermediate profiles are set, when installing the profiles, you must use the level.

And the final part when mounting the frame, attaching the upper guide to the ceiling.
When working with gypsum plaster, it is necessary to have a construction knife, a peeling plane for processing edges.
Useful Tips
When installing the gypsum board, it does not matter which way to move, but it must be borne in mind that the drywall should not stand on the floor, it must be laid under it, with a thickness of 8-10 mm., Which are removed only after fixing the sheet, this space should be filled with moisture-proof sealant protecting against moisture.
When mounting on a frame, the sheets are placed tightly to each other, the screws are screwed in with a screwdriver at a distance of 20 - 25 cm, and at least 10 cm from the edge of the sheet.
When working, care must be taken not to break drywall with screws.
On the working surface of the profile there should be no irregularities, bulges, etc. After installing drywall with a steel spatula, at least 20-25 cm wide, and putty all joints and screw heads are aligned to achieve perfect angles, you can use a perforated metal corner , which is embedded in the putty mass.

It is advisable to mark and drill with a drill in advance, or cut openings for sockets or switches with an electric jigsaw, if necessary.
For primer joints, it is better to use deep soil (typhoid soil).
Replace the screw heads in drywall by 1 mm., So that it would be better to cover them with putty.
Gypsum plasterboard wall covering with glue
wall marking
With this method of wall cladding, it is necessary to have: a flat beam (rule) 2 meters long, a large rubber mallet, trowel (trowel), a bucket, roller or brush for priming.
First, the most protruding part of the wall is determined, in this place the drywall is adjacent to the wall. Then set the screws, about 10 cm. From both corners.
They take a cord and pull it over the entire length of the wall, then put the cord on the heads of the screws and begin to adjust them, twisting and twisting so that the cord touches the most protruding part of the wall, thus finding a plane through three points.
glued drywall
Having one mark (mark) in the corner, using a plumb line or level, you can find other (marks) vertically. Markings are made on the wall marking the joints of drywall, and, accordingly, the centers of the sheets.
After such a hanging of the wall, it is clear which layers of glue are supposed to be applied.
In places where the thickness of the adhesive layer exceeds 13 mm. that is, it exceeds the thickness of drywall, glued strips of drywall, remembering one of the basic rules of any gluing: the thinner the layer of glue, the stronger the connection.
Using the rule, check the alignment results.
Lining is prepared, for the convenience of applying glue, the sheets of drywall are laid at an angle on a chair or goats. Having placed the sheet against the wall in accordance with the marking, they take a rule, a mallet and, gently tapping, press the back of the sheet to the glued strips or screw heads, achieving verticality. With the rest of the drywall sheets, they perform similar actions, not forgetting to control the coincidence of the plane of adjacent sheets.
masters advise
In case of doubt that the sheet will be distorted, the sheet is temporarily fixed on the wall with a dowel and a self-tapping screw with a washer, and the next day it is additionally fixed with a dowel-nails.
When puttying joints, the material intended for this is necessary; paper-based corner forming tape is usually used, applying it to the outer and inner corners, as well as at the corners of the walls adjoining the ceiling.
Experts do not recommend the use of fiberglass mesh tape in order to prevent the formation of cracks. Professionals for puttying joints usually use a special spatula with a curved blade, you can take any spatula with a width of 200-250 mm for the home foreman.
Good luck with your repair.
