Search
Login
Recommended
How to assemble the frame pool correctly, a detailed process for assembling the frame pool, useful tips
Own artificial pond on a country site is an opportunity to have a good rest with family and friends, get the desired coolness and freshness on a hot day, give children fun games and outdoor activities. Of course, the construction of a stationary pool is an occupation requiring considerable material costs and time, therefore, owners of country houses often opt for frame structures - more affordable, the installation of which will take only a few hours. An attractive point is the ability to assemble a frame pool with your own hands.
Content:
- The main advantages of frame pools
- Installation of a frame pool - first of all, choose a suitable place
- Preparing for installation work
- We carefully prepare the installation site
- Features of the installation of frame pools - we take into account the recommendations of specialists video
- How to assemble an Intex frame pool video video
- How to assemble a frame pool yourself
- Preparing the pool for operation
The main advantages of frame pools

The fact that the frame structure is the most profitable and economical version of the artificial reservoir for a country house is indicated by the following facts:
-
shape and size can be very diverse - depending on the wishes of the owners and the availability of a free platform for the placement of the reservoir;
-
depth can be quite large - up to 3m;
- construction service life - up to 20 years
-
the bottom may have a different level of depth;
- operation can be carried out throughout the year, but if desired, you can create a structure that will be easily dismantled for winter time;
- the ability to install high-quality filters will maintain proper water purity;
- arrangement at will can be changed;
- to assemble the structure will require a minimum number of tools and time.
Installation of a frame pool - first of all, choose a suitable place
The convenience of its operation and ease of maintenance will largely depend on how correctly a place for a reservoir is chosen. The most successful is a slightly elevated platform, flat, located in a place well-lit by the sun, away from trees. This arrangement will prevent the ingress of a large number of falling leaves into the water, will provide active heating of the water to a comfortable temperature. Puddles under the pool will not form during rainfall or its active use. The disadvantage of this option may be an increased need for monitoring the quality of the water in the bowl and an increase in the consumption of care products due to the high temperature of the liquid and its constant illumination by the sun.
Preparing for installation work

Before you assemble the frame pool, you should decide whether it will be buried in the ground or not. Usually, installation is carried out on the surface of the soil, but some models require mandatory deepening. Clarify this question is recommended by the sales manager. Installation in the pit will require a rather impressive amount of work: digging the pit itself and constructing a supporting reinforced concrete slab. The water in the buried bowls warms up worse, i.e. installation of a layer of insulation between the walls of the pool and the ground will be required. To avoid problems with a high level of groundwater, the construction of a high-quality drainage system will be required.
We carefully prepare the pool installation site
Frame pool instruction, this assembly instruction must be attached to the product. It is recommended to install the pool in a perfectly leveled area. Before installation, it is covered with sand, but it is undesirable to lift it with sand - the sand is prone to leaching, over time, the structure can sag and deform. The best option is to cut the soil, while removing the roots of bushes and grass, fill up to 5 cm of clean river sand. Sand will also be needed to backfill the bottom of the walls of an already assembled pool in order to protect the internal PVC waterproofing liner. Under the liner you will need to install a lining of geotextiles - it will protect damage from small pebbles and roots.
Features of the installation of frame pools

For each type of frame pools there is a detailed assembly instruction. It is recommended that you carefully study it and carry out all further work in accordance with its paragraphs. To work, you will need:
a set of screwdrivers and wrenches, a set of hex wrenches, an adjustable wrench and a clerical knife.
In order for the work to be completed successfully, one should not neglect the recommendations of specialists. The work is best done on a quiet day - the wind will interfere with the deployment of a sheet-wall. So that wrinkles do not form on the surface of the cup package, it should be laid out in the sun in advance - the material will warm up and will be more docile.
To facilitate the movement from the pool before unfolding the sheet wall, the ladder included in the kit should be assembled. By installing a wall sheet, you will need to track the location of the holes for the return nozzle and the skimmer - they should not fall on racks or in inaccessible places. It is more convenient to flatten the sheet holes with the help of a screwdriver inserted in them.
It is convenient to glue the geotextile fabric inside the pool with tape together and attach it to the walls. After assembling the frame, the cup package should be carefully inserted into the frame. First, the cup package is hung on the walls, then the pool is partially filled with water, the liner is carefully straightened so that wrinkles do not form. Then you can begin to fasten the package around the perimeter.
The best result can be achieved by using a vacuum cleaner - this will help achieve perfect adherence of the package to the frame of the structure. The cutout under the skimmer is sealed with adhesive tape, air is downloaded through the hole for the return nozzle.
When the water reaches a level of 10-15 cm in the cup, you can proceed with the installation of the skimmer and the nozzle return, all actions should be performed according to the attached instructions. After assembling the filtration system, fill the container with water and make sure there are no leaks.
How to assemble an Intex frame pool
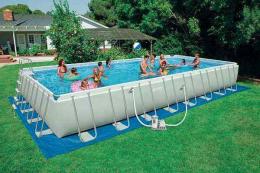
The installation of different models of popular Intex pools is carried out according to the instructions, it is quite possible to complete the assembly with your own hands. It will take about an hour for a person who knows how to handle a screwdriver and keys to assemble. The instructions describe in detail all the details and the order of the connection, for the convenience of operation, the parts should be previously laid out in places.

An Intex frame pool kit usually includes:
-
lining to protect the bottom from damage,
-
filter pump
-
prefabricated stairs
-
a skimmer and a net for cleaning the surface of the water,
- awning.
The metal frame of the pool is quite strong, it allows the structure to maintain its shape, is able to withstand heavy loads. It also maintains the shape of the pool and gives it stiffness with a polypropylene tape encircling the pool.
Installation of the pool can be performed directly on the ground, provided it is sufficiently hard. If leveling the plane to horizontal was carried out by adding soil, then its surface will need to be well tamped, then covered with sand.
The drain valve can be connected to a regular hose for irrigation - water from the tank can later be used to water trees.
How to assemble a Bestway frame pool or other models from different manufacturers can also be viewed by watching a video with the recommendations of professional masters.
How to assemble a frame pool yourself

To independently create a pool with a wooden frame, you will need:
- edged board 25 mm,
- wooden beam 50x50 and 50x100 mm,
- dense awning fabric, 650 g / sq.m,
- if the structure will be decorated outside, then you will need a facing material, for example, a lining,
- wood preservative, bituminous mastic,
- through metal rings - eyelets,
- galvanized screws.
Of the tools required:
- screwdriver
- construction hair dryer with crevice nozzle.
Naturally, before starting work, it will be necessary to develop a project, depending on the planned size of the structure, the amount of building materials will be calculated. The sketch will need to determine the location of the supporting parts, the number of bars and boards. So that the water pressure could not cause the destruction of the structure, you need to take care of its sufficient rigidity.
It is desirable to use lumber well dried and treated with an antiseptic. It is better to use self-tapping screws reliable - blued, black, not rusting.
The part of the supporting bars that will be dug into the ground must be treated with bitumen mastic.
The site intended for assembly is marked out, at the corners and sides dig holes with a depth of 0.5 m for supporting and intermediate columns. The recommended distance between them is 1.5 m. The corner posts are aligned with a plumb line, checked diagonally and then covered with sand and gravel, rammed. Intermediate columns are also installed.
To fasten the bars using an edged board, it is fixed with screws from the inside, this will reduce the load on the screws. To strengthen the support pillars, braces of 50x50 mm timber are installed from the outside.

For the manufacture of a bowl of a pond, PVC tent fabric is used, it is durable and can serve for a long time. the fabric is cut according to the drawing. At least 30 mm are left for allowances at the inner seams, at least 100 mm in the upper part.
The cut fabric is glued at the seams with a hairdryer, the panels overlap the width of the allowances. The fabric is heated to its melting point and rolled with a roller. Having collected the bottom, they proceed to the processing of the upper edge: they are bent by 100 mm, glued. The eyelets are then installed every 50 cm.
The base of the reservoir is placed inside the assembled frame, it is straightened carefully. Fastening is performed with screws through holes in the grommets, using wide washers. It is necessary to ensure that the tension of the fabric is uniform.

To finish the upper part of the side, a board opened with waterproof varnish is used. The ladder for such a pool can be used metal or wooden, but one that would not have sharp fragments - they can damage the fabric.

Outside, the building can be sheathed with lining, the finish will give it an aesthetic appearance.
Preparing the pool for operation

After assembling the frame reservoir, it is filled with water and the first thing to do is treat the liquid - it is disinfected, treated with preparations that prevent the active development of algae. The pump of the filter unit is connected through a protective shutdown device - this will prevent the possibility of electric shock to people.
A daily filtration of at least one volume of water should be envisaged - otherwise the pool will come into neglect and restoration of its functioning will require a lot of time and money.


