Search
Login
All the subtleties of laying granite
Porcelain stoneware is similar in composition to ceramic tile, but its properties are noticeably different from it. In this article, you can learn the most basic nuances of laying granite.
Content
- Advantages and disadvantages of porcelain stoneware video
- Preparation for laying granite
- Choose a glue for styling
- Paving work video
- Grouting
- The final stage after laying granite
Advantages and disadvantages of porcelain stoneware
Under tremendous pressure and at high temperature, laying tiles - porcelain tiles are produced.
Thanks to such harsh conditions, the tile turns out to be extremely homogeneous, there are practically no pores in it.
Such material is not subject to pollution, which cannot be removed, since porcelain stoneware, in comparison with other finishing materials, has the lowest water absorption.
Low water absorption allows the use of porcelain stoneware for facade work, since this tile is not destroyed by repeated temperature changes.
Porcelain tile has a special strength, so in areas with high pedestrian load - this is the first candidate for flooring.
There are no traces of sand on the porcelain stoneware, no scratches, as this tile is painted through the production through.
Even if chips appear, they will be practically invisible in color.
Porcelain tile is a resistant soldier against chemical aggression, he will be able to withstand even acid spilled on him and all kinds of detergents.
Porcelain tile is the best tile for a warm floor, as it has a high coefficient of thermal conductivity.
This amazing material, unfortunately, has a drawback.
Fragility, as opposed to stiffness, is a major disadvantage.
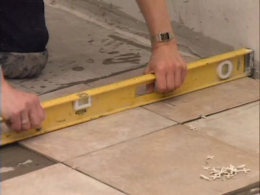
Therefore, before laying porcelain tiles, it is necessary to perfectly level the floor surface.
Otherwise, even the slightest difference in height can cause a high voltage in the thickness of the material and the porcelain tile will crack at the slightest load.
Preparation for laying granite
Having gained knowledge in the first paragraph, we prepare the basis for laying granite.
The foundation must be made smooth and stable.
Cement screed should fully mature, and its maturation within a month.
In addition to the base, it is necessary to prepare the tile itself.
During production, manufacturers apply a protective layer on the front surface of the tile, in the form of technical paraffin or wax.
Technical paraffin is easily removed from the tile with a spatula.
If wax is applied to the tile, the tile must be washed with a warm soapy solution.
Choose a glue for styling
In accordance with the European standard, when laying porcelain tiles, it is necessary to use glue of class C2.
The adhesion of this glue exceeds 1N \\ mm2, since the tiles are quite heavy and therefore the power of the glue is a very important thing.
Keep in mind, since porcelain tiles do not have pores, then if the glue is weak, it simply will not be able to catch.
Glue in the form of dry mixes experts advise to breed special elasticizers.
Elastifiers are able to make the adhesive elastic, and this is important, since porcelain stoneware is a brittle material and with any shear of supporting structures, porcelain stoneware can swell and fall off.
Paving work
After preparing the base, tile and glue itself, the glue is applied in two steps.
The first layer is applied with the smooth side of the spatula with a layer of 1-3 mm.
The second layer is applied by the notched side of the spatula.
The first tile is laid, the next tile is placed on the edge to the edge of the adjacent tile, then it is completely lowered onto the adhesive solution.
With the help of crosses - dividers, freshly laid tiles are moved away from the neighbors.
Excess solution is removed with a damp sponge.
If the area is large, be sure to leave a compensation seam.
When laying tiles indoors, a dividing seam is made through 50-70 m2 of area.
If the tile is laid outside - the dividing seam is made through 25-35 m2.
If the tile is laid in small rooms, the gap is left between the tile and the wall, then it is closed by the baseboard.
This gap can be either empty or filled with elastic material - it can be silicone sealant.
The gap must be left at the exit points of various pipes.
Porcelain tile is laid with a gap of 3-12 mm.
If the tile is laid in a heated room all year round, the tiles themselves are calibrated, and the edges are cut with a diamond tool and have a flat surface - such tiles can be laid with a minimum seam, about 1 mm.
Grouting
The seams between the tiles are filled only after the glue has completely dried, otherwise the tile may simply crumble.
Grout is applied to the cladding using strong pressing movements, diagonally to the seams., Surplus is removed with the same movements.
Excesses are removed with a clean, damp sponge.
And the grout itself is best applied with a rubber trowel.
The final stage after laying granite
Half an hour after the completion of the grout, the porcelain stoneware is cleaned of glue residues and suture aggregate.
Stripping is done using special acidic compounds.
Walking on freshly laid porcelain tiles is possible only after 3-4 days.
In case of emergency, a pedestrian bridge from boards is laid on the surface.
Only 15 days after grouting and cleaning the tiles, floor cleaning is allowed.
If polished or semi-polished porcelain tiles are laid, it must be treated with a waterproof repellent, since polishing will violate the structure of the surface layer of porcelain tiles.
Therefore, in particularly dirty places, it is recommended to use matt porcelain stoneware.


