Search
Login
Recommended
Installing the furnace in the bath, how to install the furnace in the bath yourself
The focus of heat and soul of any structure is the stove. This postulate directly relates to the bathhouse, where it is so nice to go after a busy day and drive out the accumulated fatigue and bad mood in the steam room with a broom. There are several types and options of bath stoves, which must have special characteristics and pump heat in a short time.
Content
- Choosing a stove for a bath
- The scheme of installing the furnace in the bath
- Rules for installing the furnace in the bath
- Installing a stove in a wooden bath
- How to make a pipe pass through the ceiling in a bath do-it-yourself video
Choosing a stove for a bath
Before performing work on installing the stove in the bathhouse, you need to decide which stove you want to see in the steam room. In principle, there are only two main options, and each has its own advantages and, accordingly, disadvantages.
Metal furnaces heat up very quickly, and besides, fuel for them will be required at times less than for brick ones. The cost of such a furnace is quite low and it is quite simple to mount and install it. You can buy a factory version of a metal furnace, or you can make an order for welding to local craftsmen, providing the required dimensions.
The disadvantages of this type is the lack of heat accumulation, that is, when the furnace process ceases, such a furnace cools extremely quickly.

Brick stoves for a bath, a more expensive, costly and time-consuming option. Such furnaces are installed to produce softer heat that lasts a long time. In addition, this type of furnace is much safer, since the risk of burning is reduced to zero.
The main disadvantage of a brick furnace is the duration of heating and, accordingly, high fuel consumption. In order for such a furnace to heat up properly, it will take at least 4-5 hours, during which it will have to be continuously heated.

The installation diagram of the furnace in the bath
When a bathhouse is being built with one's own hands, installation of a furnace is almost the most important stage of construction. In order not to make mistakes and arrange the heater as competently as possible, you need to outline the installation diagram of the furnace in the bathhouse. When making a drawing, you need to remember that the furnace should be at least a meter from the walls, and the pipe must be led out through a specially prepared chimney. In order to avoid the risk of burns, bath shelves and benches should be at least 1-1.5 m from the stove, and the door of the stove should look in the corner of the bath.

Rules for installing the furnace in the bath
The furnace must be installed on a special base (foundation), which will serve not only as a support, but also prevent fire.
Near the door of the furnace, it is necessary to lay a metal sheet, which will protect the wooden floors from accidentally emitted coals and sparks. Under the metal, you can lay any heat-insulating material with non-combustible properties.
The hole for the pipe extending into the ceiling needs to be equipped with additional insulation, for this you can use a metal sheet rolled into a cylinder through which the pipe will be discharged. The gaps between the pipe and the cylinder walls can be filled with asbestos cloth, which will prevent fire.

Installing a stove in a wooden bath
Most often, baths are built from various types of wood, so there are always more questions about installing a stove in a wooden bathhouse.
Having a solid foundation is the first important step to installing a furnace. Many do it even at the stage of pouring the foundation, pre-determining the place where the heater will be. In this case, a separate area corresponding to the dimensions of the future furnace is poured with cement, which will serve as the basis for the installation.

If the foundation for the furnace is not a problem. A metal stove does not weigh so much and you can equip a stand for it directly on the floor. To do this, you need a stainless steel sheet, bricks and a fireproof plate.
First, a refractory stove is laid and fastened to the floor with self-tapping screws. Then bricks sit on the mortar and after the mortar dries, they are covered with a layer of special glue on which the metal sheet will be held. On the resulting refractory cake, the oven can be installed in 1-2 days. This period is necessary for reliable drying of the mortar and glue.
After arranging the base, you can proceed to the installation of a metal furnace in the bath.
If you purchased a stove from the manufacturer, then the installation instructions are included in the kit and you just need to follow it during installation. But most often, local homemade stoves cook the stoves and here, when installing, you need to be guided by common sense and the advice of experienced builders.

An oven is installed on the prepared base. The dimensions of the refractory stand should correspond to the length and width of the furnace. The stove is installed with doors to the entrance, and the heater should be directed to the corner of the steam room.
After the furnace is installed, you need to equip the chimney and install the pipe.
Recently, there has been a fashion for square chimneys that look more aesthetically pleasing and fit better into the interior of the bathhouse. However, it is not practical to mount such a chimney, since soot and soot are collected in the corners of the structure, which prevents the free exit of smoke.
A round pipe made of stainless steel will be the best option for arranging a chimney when installing wood stoves in a bathhouse. The diameter of the pipe must exactly match the diameter of the outlet in the furnace. The length of the pipe is calculated individually, but in any case it cannot be less than 5 m. To prevent fire as a result of high temperatures and the contact of hot metal with wooden surfaces, a ceiling-mounted unit is installed that will perform thermal insulation functions. The assembly is a hopper made from a rolled sheet of stainless steel, in which there is an opening for the outlet of the pipe. The free space between the pipe and the walls of the bunker is covered with expanded clay or laid with basalt wool (any materials with thermal insulation properties can be used).
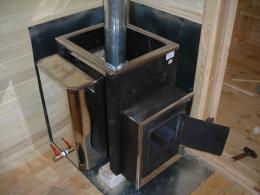
After installing the pipe, you can finally flood the bath and check the results of your work. The installation of the furnace in the bathhouse, the photo of which you see, was made entirely by hand, which does not prevent it from functioning normally and pumping the desired temperature in just a couple of hours.


