Search
Login
Recommended
How to make a screed under an electric floor heating? Screed under the warm floor will provide not only energy savings, but also quick heating of the warm floor
The duration of the operating period of a warm floor directly depends on the quality of the screed and the installation of an electric heated floor under the screed. Even a slight deviation from the rules can lead to the failure of the warm floor, which will entail additional costs for its complete replacement.
Content
- Advantages and disadvantages of underfloor heating under screed
- Preparing the base for laying a warm floor
- Cable selection
- Installation of electric underfloor heating using resistive cable video
- Consequences of uneven screed drying
Advantages and disadvantages of underfloor heating under screed
In relation to the various methods of the main or additional heating, the underfloor heating under the screed has a number of characteristic advantages:
- Reliability. The service life is about 50 years, subject to proper installation of all components. In addition, the device does not require maintenance.
- The presence of a screed provides a high level of protection against external influences.
- The underfloor heating system guarantees the absence of drafts, which has a beneficial effect on health.
- Profitability. The ability to adjust the temperature in the room through a thermostat.
A significant drawback of this type of warm floor is the need to create a screed, as a result of which the height of the room decreases from 3-15 cm.
Preparing the base for laying a warm floor
All work associated with the installation of an electric heated floor is carried out in a room freed from furniture. If necessary:
- old floor covering is dismantled;
- construction waste is removed;
- deep cracks are puttied.
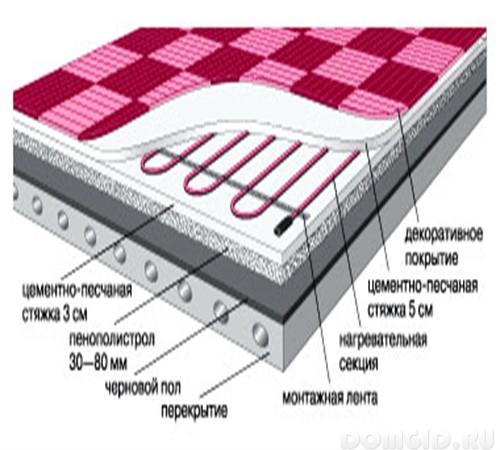
After the putty places have completely dried up, you can proceed to the direct screed under the warm floor, which is a combination of layers of various materials.
- Base of the floor. For laying a warm floor, only a flat surface is needed, since any unevenness can lead to the failure of the heating cable. To level the floor, you can use cement, gypsum, or self-leveling mixture.
- Waterproofing. The waterproofing layer acquires special significance when there is ordinary soil under the ceiling, or an unheated basement, since condensation forms under the ceiling. In the absence of waterproofing, condensate enters the heat-insulating layer, contributing to a decrease in thermal insulation properties and heat loss. As a waterproofing material, a plastic film suitable for overlapping 8-10 cm over a rough concrete screed is suitable. For better sealing, the joints of the seams are glued with tape, and the edges of the film are wrapped on the wall, 4cm.
- Thermal insulation. Thermal insulation layer is aimed at preventing heat loss. The feasibility of thermal insulation increases especially if the work is done on the ground floor. Extruded polystyrene and penofol are suitable as heat-insulating materials. The top of these plates is covered with foil, so you do not need to lay an additional heat-reflecting screen, which contributes to an even distribution of heat along the concrete screed.
- Damper tape. A damper tape is glued around the perimeter of the lower part of the room, compensating for the expansion of the screed when heating a warm floor. The top of the tape should protrude 2 cm above the level of the intended flooring. At the same time, the apron of the tape located below should overlap the seam between the heat-insulating layer and the tape in order to prevent the screed from getting on the insulation layer. The absence of damper tape will lead to the permanent cracking of the screed after several cycles.
- Metal grid. By means of a mesh, better adhesion of the concrete screed is achieved, and in the absence of a screed, it eliminates cable overheating.
- A cement-sand screed is made with a thickness of at least 3 cm, since a thinner layer can crack. This stage completes the preparatory work before laying the warm floor.
Following the step-by-step description, the device of a coupler of a heat-insulated floor will not cause difficulties even for not qualified specialist.
Cable selection
According to the type of heat generation, the cable is divided into:
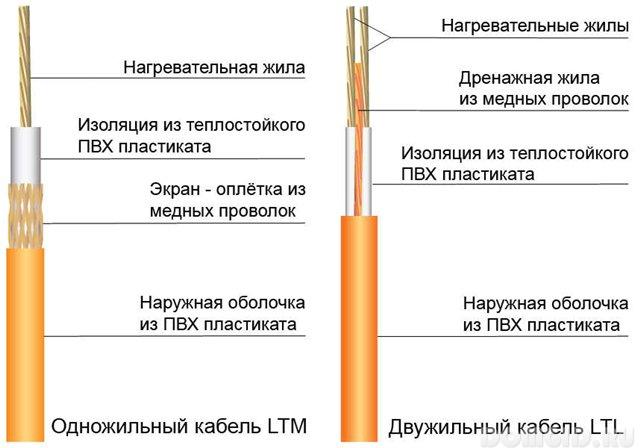
1. The resistance cable is characterized by a heating element covered with an insulating layer and a metal braid. Based on the number of cores and the method of laying, there are two types:
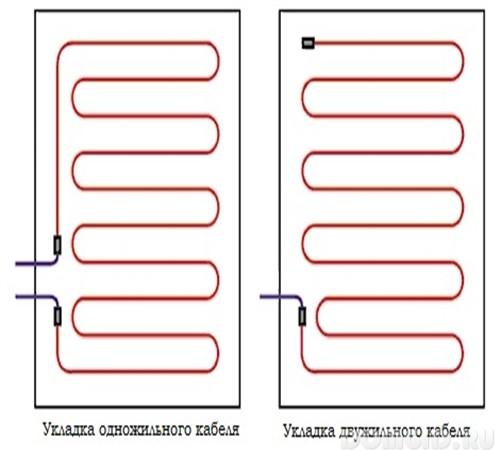
- Single-core cable the presence of one heating core. Relatively two-core cable has a higher electromagnetic radiation and more complex installation, although it is much cheaper. The optimal use of such a cable is reduced to a corridor, a balcony, a bathroom.
- Two-core. In addition to the heating core, the cable is equipped with a conductive core, which reduces the level of electromagnetic radiation and simplifies laying the cable to the surface. Significantly exceeds the cost of a single-core cable. More suitable for bedrooms, kitchens.
The main advantage and, at the same time, the disadvantage of the resistive cable is the uniform heat generation along the entire length, so you can not lay the cable under the furniture.
2. The self-regulating cable is equipped with two conductive cores with a polymer located in the center, which acts as a heating element. When a certain section is overheated by means of the resulting resistance, the heat release of a precisely overheated section decreases.
With respect to the resistive, self-regulating cable is devoid of the disadvantage of the first, prolonging the operating life of the warm floor. Although this advantage is much more expensive than laying a resistive cable.
Installation of electric underfloor heating using resistive cable
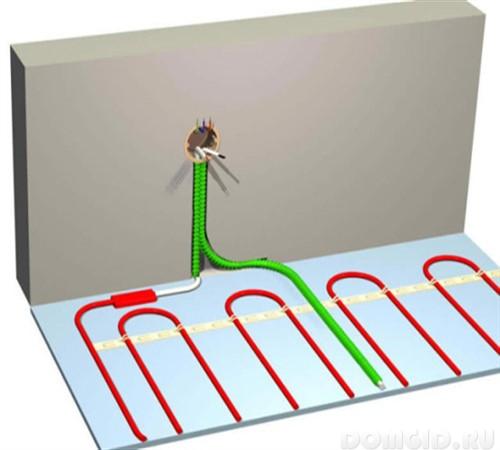
Since the cable should not run under the furniture, it is necessary to determine the area intended for laying the cable. Based on the free space indicator, the step-by-step distance between the cable \u003d area x 100 / cable length is calculated.
stages of installation
Make a drawing with a detailed location of the temperature sensor, cable, connector, end sleeve, as well as the place of connection to the mains. In the process of laying the flooring, damage to the heating cable may occur, then the drawing will facilitate the search for the damaged area.

- A wall is made in the wall to connect the cable wires to the thermostat.
- A concrete screed adjacent to this wall also has a recess of 50 cm in length, intended for laying a temperature sensor.
- The fastening of the mounting tape to the screed is made using dowels and nails through 50-100 cm.
- Cable laying must be carried out with uniform loops over the distance calculated above, starting from the location of the thermostat. In this case, the heating cable should not be in contact with each other.
- The temperature sensor is placed in a corrugated tube having a plug on one side that prevents the screed from entering it. The tube is placed in a pre-prepared gate located between the cable lines.
- The cable resistance is measured using a tester. If the data obtained coincides with the parameters declared by the manufacturer, you can connect the system to the thermostat via couplings, while the thermostat must be disconnected from the network.
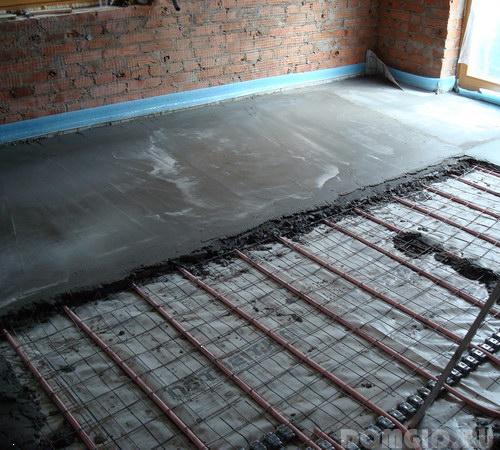
- Filling with cement-sand mortar of the laid warm floor should be done very carefully to avoid the formation of air pockets.
screed thickness
The optimal thickness of the layer of the last screed varies between 4-6 cm, since the entire device of the electric underfloor heating should sink in solution.
After filling the floor, the room must be darkened and drafts should be avoided. Such conditions contribute to uniform drying around the perimeter of the room. After a day, the screed is covered with a film until the solution completely dries up, taking 30-35 days.
functional check of a heat-insulated floor
The performance of the installed electric floor can only be checked after the concrete screed has completely hardened. Uncured mortar can cause the underfloor heating system to fail, cause cracks, or short circuit wires.
Consequences of uneven screed drying
If even slight cracks are found in the concrete screed, immediate measures must be taken to eliminate the problem. Otherwise, this will result in unwanted problems:
- Uneven heating of the floor and, accordingly, the room.
- The occurrence of areas with a temperature exceeding the norm, leading to overheating of the heating cable, entailing the failure of the floor system.
Properly executed screed underfloor heating + do-it-yourself will not only affect the reduction of energy consumption, but also the rapid heating of the room.
