Search
Login
Weather vane, how to choose and install, so that it is beautiful and informative
For many centuries, a roof-mounted weather vane has been adorning the top of surviving medieval castles and modern houses. It plays not only an aesthetic role, but also carries a well-defined functional load. The weather vane shows the direction of the wind, and some types show its strength.
Content
- Features and types of weathercocks video
- How to make a weather vane (option one)
- Mounting a weather vane (option two)
- Installation of a weather vane in a chimney
- Materials video
Features and types of weathercocks
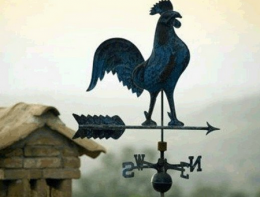
The most common are traditional weathercocks depicting animals or birds. Most often it is a rooster or a stork. Such devices are quite simple and indicate only the direction of movement of the air mass. They often perform a decorative function and give a finished look to the building.

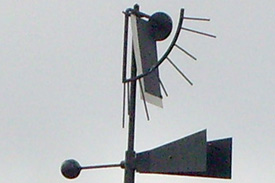
Weathervane Wilda. In addition to the direction of the wind, he can determine its strength. Its design includes a metal plate, which is mounted vertically and can change its position depending on the strength of the wind. The greater the angle of inclination, the higher the air flow rate.

Chimney weathercocks are designed to protect the pipe from blowing.

Anemorumbometers meteorological instruments are highly accurate, as they are carefully balanced during manufacture.
Modern weathercocks are distinguished by a variety of materials from which they are made and high sensitivity. Corrosion-resistant coating extends their service life to decades. The strength of the wind is simply measured with a small light propeller.

Today you can buy a weather vane forged or stamped; copper or steel; in the form of a classic rooster or a stylized motorcyclist. But many owners of country houses are not looking for easy ways and prefer to make a weather vane with their own hands.

How to make a weather vane (first option)
- The stand is made of a piece of thin pipe (diameter 12 mm) with a thread at the top. The length of the workpiece is 125 mm. The bearing is mounted below in size. The weather vane will be attached to the roof using metal (steel) strips, which are fixed on the side of the base so that they do not interfere with rotation around the vertical axis of the weather vane.
- The cover is made of a steel billet with an internal thread corresponding to the external thread of the body of the future weather vane. A wind rose is mounted on top of the lid - metal tubes indicating the cardinal points. A cap is installed on top to protect the structure from precipitation.
- The most interesting part is making a stainless steel weather vane. To do this, drawings of weathercocks are selected or drawn independently. According to the finished drawing, the body of the weather vane is cut out and fixed with bolts or welding to the rack. When everything is ready, it remains to mount the weather vane to the ridge of the roof.

Mounting the weather vane (second option)
The first step is to exhibit a made wind rose in accordance with the existing in the area. This is done using a compass.
The direction of the wind is determined by the location of the plate (1) and the counterweight (2). As a plate use any flat figure.
Important! The figure and counterweight must be balanced so that the lateral axle load is minimized.

- The weather vane is mounted on a metal sleeve (3) for free rotation on a steel rod (11).
- A steel ball (4) is placed at the end of the axis to reduce friction.
- An umbrella (5) on the sleeve protects the rotating elements from moisture. The sleeve is mounted on the axis with a fixing screw (6).
- A rubber gasket (7) is placed between the screw and the sleeve for free rotation.
- The coupling (8) and pins (9) oriented to the cardinal points are put on the rod.
- The round flange (10) is welded to the end of the axis. Its size should be sufficient to hold the structure on the roof ridge.
The weather vane is installed at a height of 10 meters from the surface of the earth. Therefore, it can serve as a lightning rod. To do this, it must be grounded, stretch the wire from the metal structure and deepen into the ground by one and a half meters.
Installation of a weather vane in a chimney
The weather vane is attached to the pipe of the house with special strips-spacers. The place for him should be at the highest point of the house on the chimney hood.

Here, the structure will be subject to the highest loads. Therefore, the thickness of the braces should be at least 2 mm. For work you will need: a metal bracket, a drill, a riveter, a lerka for threading, a wrench, washers and nuts.
Materials
Often there are steel or copper weathercocks coated with paint for outdoor use. Less often you can see forged elements. Weathervanes made from improvised materials are very rare.

For example, from plastic bottles that have served their age drives, moisture-proof plywood, tin, etc.

You can come up with some dynamic elements in the design of decorations for the roof. A horse figurine, set in motion by a pecking bird or transmitting parts from a propeller, can become a landmark of the entire garden community. Folk fantasy has no boundaries, so you can make your house unique and original.
Important! Wooden movable elements are not rigidly connected so that the dynamics are not disturbed.

Moving parts of the weather vane on low garden houses are clearly visible. In addition, they can scare away birds during fruit loading. Small weathercocks can be installed on arbors, greenhouses, garages and other small architectural forms.


